Virtual Audio Cable (VAC) is a third-party software program that allows the rerouting and the emulation of a sound card in software rather than having to use a second sound card for audio analysis or use with digital mode programs such as MixW and WSJT. There are some significant advantages to using VAC over a second sound card.
- The entire audio stream is maintained in the digital domain - there is no multiple conversions of the signal from digital to analog and from analog to digital.
- There are no external cables to degrade the sound quality or possibly pick up RFI.
- A computer PCI, Firewire or USB slot is not used.
VAC version 4.0x is an upgraded version from 3.12. Some of the new enhancements are:
- 1..20 milliseconds per interrupt.
- Almost any of fixed point PCM audio formats (200..1000000 samples per second, 8..32 bits per sample, 1..8 channels). Floating point formats are not supported.
- Almost no sound latency with maximal interrupt frequency.
- Signal mixing (with saturation) between output port clients.
- PCM format conversion between clients on either end of the VAC cable.
- Volume control features.
- WDM/KS Audio technology native for Windows 2k/XP/2k3.
PowerSDR version 1.6.0 (and above) has native support for VAC when using the DRM or DIGIx modes. This allows the user to setup and control the audio parameters of VAC directly from the PowerSDR console.
VAC is written and maintained by Eugene Muzychenko. You can get information from the VAC Home Page.
Configuring VAC 4.0x
Note: The program's developer, Eugene has introduced a problem in his version control. His software which is labeled 4.08 on his web site comes up as 4.8 in the program's About menu. So do not be led astray. Also, screens change significantly from sub-release to sub release, so the ones shown may not be exactly what is the most current. This article has screen shots from the 4.08/4.8 version of VAC
There are several steps involved in getting VAC installed and working properly with PowerSDR. Below is a summary of the steps required.
1. Obtain and install VAC 4.0x on the same computer that is running PowerSDR
2. Configure VAC "cables"
3. Configure PowerSDR to utilize VAC
Step 1. Install VAC 4.0x as per the installation directions. If VAC was previously loaded, you must first uninstall all versions before installing a new version of VAC 4.0x
Step 2. Once installed, set up a pair of VAC audio "cables" for use with PowerSDR by opening the VAC Control Panel.
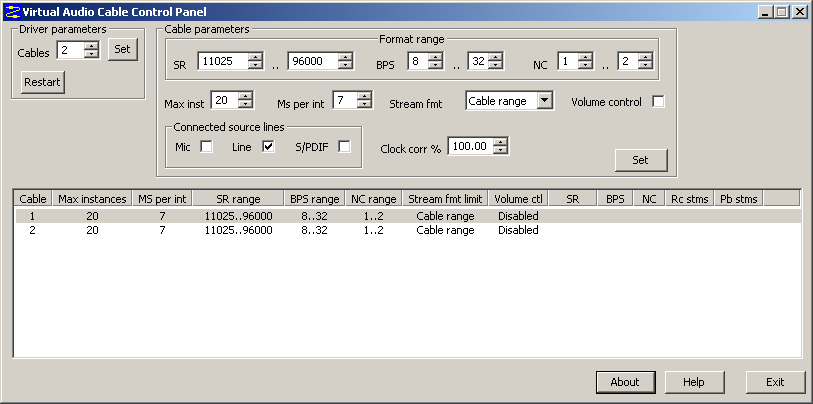
Step 3. By default only one audio cable is defined. You will need to create two cables by changing the driver parameters to 2 cables then click SET and Restart. Highlight the appropriate cable and change the values to match the figure above. In the "Ms per int" box enter a value between 1 and 20 ms. The lower the value, the smaller the VAC audio buffer. In the example above, 7 ms was selected. Depending on your computer setup you may have to adjust this value to prevent the audio from dropping out or "popping".
You can choose two different Stream limit formats; cable format and cable range. Since PowerSDR defines both audio cables' format when VAC support is enabled, using the Cable Format is recommended. If you decide to use the Cable Range stream format, one thing to consider, when a format conversion occurs, it takes significant CPU resources and it may noticeably slow your applications causing audio drops outs. Therefore using Cable Format as the stream format may help with audio drop outs. In the example above, I am using Cable Range because it provides the most flexibility and does not adversely affect the performance of PowerSDR on the computer I am using.
After completing all of the necessary changes, click on Set for each cable when completed.
NOTE: Repeat these changes for the second audio cable as well.
NOTE: Do NOT check the Volume Control box in the VAC control panel. This enables the Windows Mixer and can cause unpredictable results.
Step 4. Start up PowerSDR version 1.6.0 (or higher). Click Setup on the Menu Bar. The PowerSDR Setup program is displayed. See example below.

Step 5. Click on the Audio tab and then click on the VAC tab.
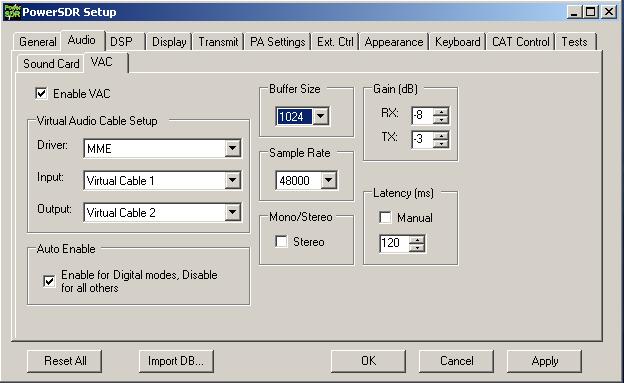
Step 6. In the "Virtual Audio Cable Setup" section, set the "Driver" to MME using the drop down box (other driver options, such as Windows WDM-KS are supported but may work depending on the sound card application being used. For this article, MME is used because it is the most compatible. Once you have VAC working, you can experiment with the other drivers. Their advantage is that they have less inherent latency for audio transfer). In the "Input" drop down box, select Virtual Cable 1. In the "Output" drop down box, select Virtual Cable 2. In the "Auto Enable" section, select this option if you want VAC to automatically engage when any of the digital modes (DIGIx or DRM) are selected on the PowerSDR console. This is the preferred setting. In the "Buffer Size" section, select a buffer size from the drop down box. Depending on your computer setup you may have to adjust this value to prevent the audio from dropping out or "popping". In the "Sample Rate" section, select a higher sampling rate from the drop down box option that exceeds the sampling rate of the sound card program you are using. Using a sampling rate of 48K provides the best audio quality and produces the fewest drop outs.
Troubleshooting Technique: In some cases the sound card program can not handle format down conversion very well resulting in no or poor audio processing. If this is the case, change the Sample rate to exactly match that of the sound card program you are using.
If the soundcard program uses a stereo mode, such as DReaM, then select the Stereo option in the "Mono/Stereo" section. And finally, the "Gain (dB)" section is the place where you adjust the AF gain of the VAC cable. Since the Volume Control was not checked on the VAC Control Panel (step #3) the Windows Mixer is not available for VAC cables. Use only the adjustments in PowerSDR to increase or decrease the volume (AF gain) going to and from the sound card application.
NOTE: Always start PowerSDR with VAC enabled before starting the sound card program so that PowerSDR can define the VAC cable format
Setp 7. To check to see if VAC is properly working, Select a digital mode in PowerSDR and make sure the radio is "On" and not in "Stand By" mode. The Open the VAC Control panel and you should see the audio cables active.
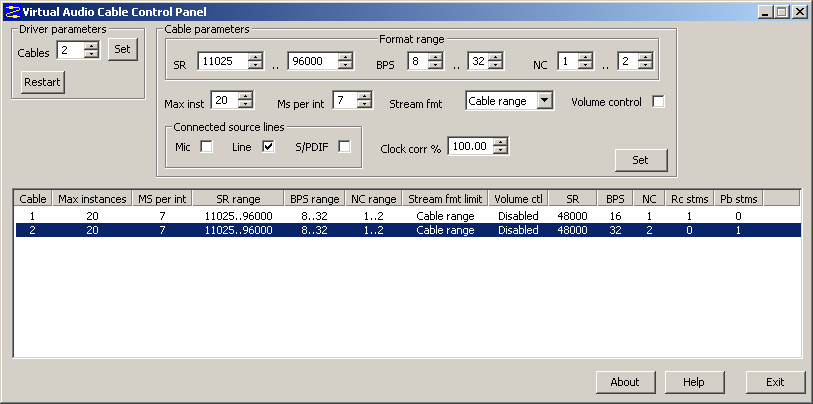
As displayed above, the VAC channels are active, but only for PowerSDR. If you look at Cable 1, you will see that the number of "Pb streams" is 0 (zero) and the "Rc streams" for Cable 2 is also 0. VAC 4.0x automatically sets up both ends of the audio cable even if the client (sound card) program is not configured or even running.
Step 8. When setting up VAC with two audio programs, the audio output of one program uses the same audio cable as the input of the other. Conversely, the audio input of the first program uses the same audio cable as the output of the other.
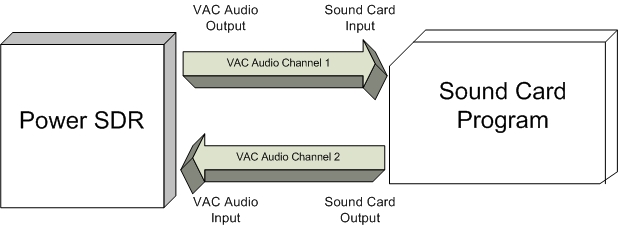
In your sound card program's setup for which sound card you are using, you will need to set the sound card input to "Virtual Cable 2" and the output to "Virtual Cable 1". Below is an example of how MixW is configured. Note that the sampling rate does not match what was setup in PowerSDR - This asymmetric configuration seems to provide the best audio quality and the fewest audio drop outs.
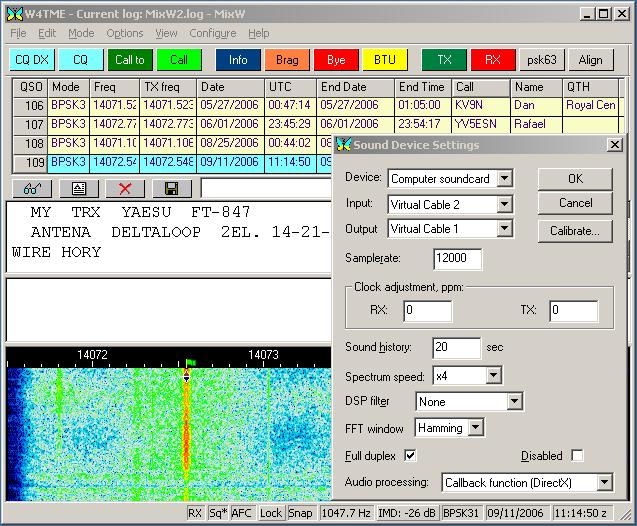
Step 9. After you have the sound card program's audio input and output set, you should start observing audio either by hearing it or watching it on a spectrum display such as a waterfall. You can verify the VAC channel for the client program is active by looking at the VAC control panel.
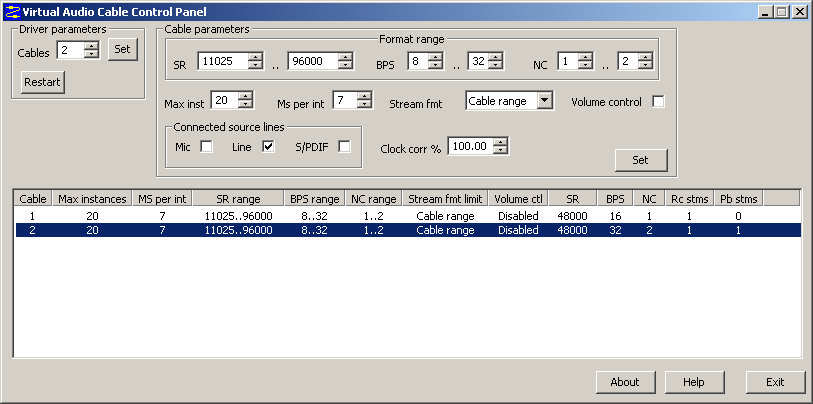
Notice that the value in the RcStream for Cable 2 has changed for a 0 (zero) to a 1 (one). This indicates that cable 2, which is the input for MixW is actively receiving audio from PowerSDR.
Note: The Pb Stream value for VAC audio cable 1 is still 0 (zero). This will not change to a one (1) until you are transmitting using the sound card program and MixW is sending audio through that cable.
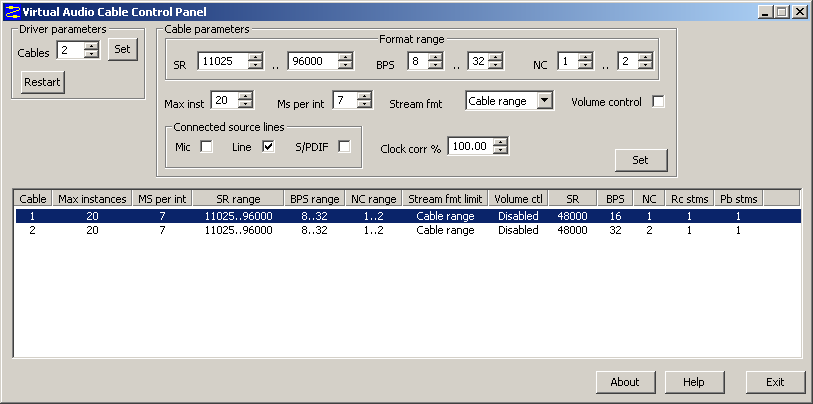
Step 10. At this point you have completed the set up of VAC 4.0x with a sound card program.
